KDManage Quick Start Guide
This guide gives new user a general overivew on using KDManage for managing phenotypic data import.
Please Note: As part of DArT’s continuous improvement all KDDart application help resources are ‘works in progress’, hence we would be most grateful for any feedback regarding errors, omissions or suggestions. You may even have some valuable tips and experiences to share with others to better leverage these tools.
- Creating a Trial
- Uploading Material/Genotype list
- Uploading Layout
- Adding Traits
- Importing to KDSmart
- Uploading Trial Data
- Accessing Trial Data
It’s important for all users to be familar with each step indvidually. However, Trial Super Import is a migration tool that can package all these steps into a single action. This can be easier and save time.
Creating a Trial
Trials should be created with as much information possible. Alternatively, users can use Trial Super Import to automatically add much of the data needed to import trial and genotype data from a single CSV.
More details can be found at Adding Trials and Trial Super Import
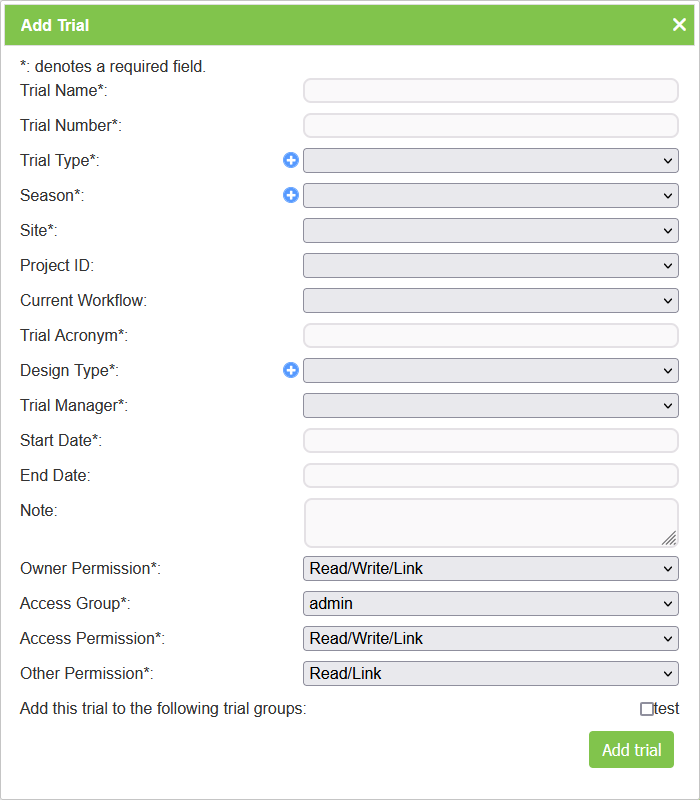
To add a new trial, select the Add Trial Button which will display the Add Trial Window. The window, along with a table that explains the relevant fields can be found below:
Note
Before a trial can be added, the Site to be used must exist. When defining the trial Location, the trial must be contained within the boundaries defined for the Site. Check with your manager that a Site has been created.
Uploading Material/Genotype list
In order to ensure Genotype and Material Ids can be properly managed and linked, users should ensure that the materials they wish to run their trials on are uploaded in the system.
More details can be found at Import Genotype
New genotype records may be imported into KDDart and if required, specimens for the genotype records can be automatically created within the process.
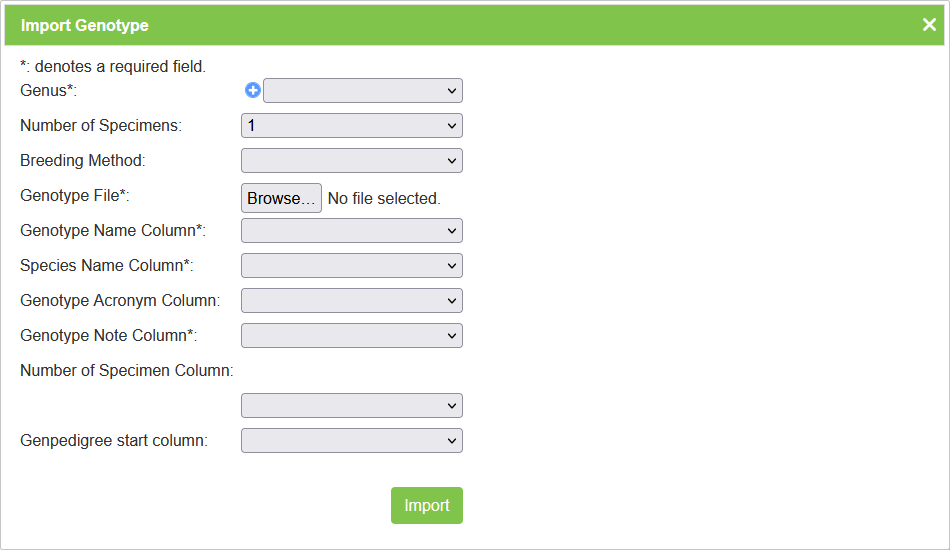
Select the Import Genotype Button to display the Import Genotype Window (pictured below). The following image and table show the fields required in an input file to import genotypes and create specimens if required.
Note
When importing a list of genotypes without the need for secondary specimens, users can simply tick “Add Specimens” to automatically add Specimens with the same name as the Genotype.
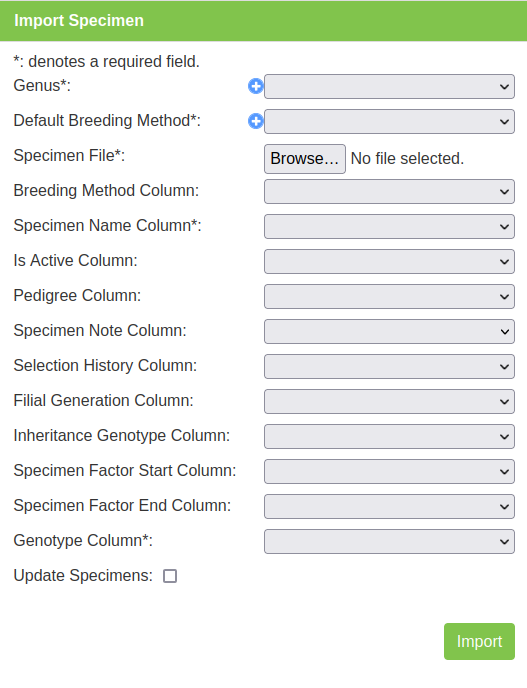
Specimens are the physical representation of Genotypes and can similarly imported using the Specimen page.
Note
The Genotypes and Specimens are the what will keep Phenotypic and Genotypic data connected so it is important the names are accurately defined across the entire system.
Uploading Layout
After Genotypes and Trials are created, users can then upload their trial layouts to the database for later use. This can be done using the Adding Trial Unit Layouts. Users can also use Trial Super Import tool.
A trial unit layout can be added to the trial with the CSV method by selecting the  Add Trial Unit Layout Button which will open the Add Trial Layout Window. The window, along with a table that outlines its fields can be seen below:
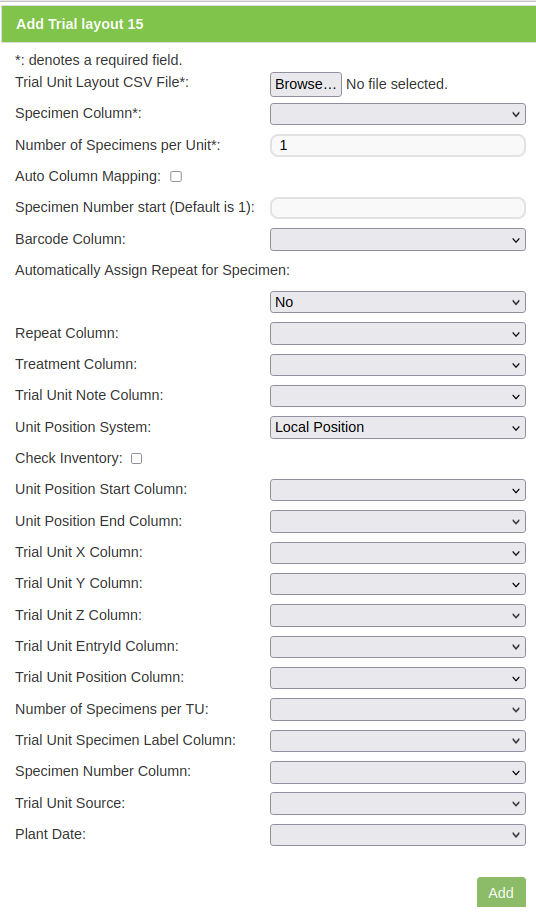
Note
It’s highly recommended that a layout that includes database wide unique barcodes.
More details can be found at Adding Trials and Adding Trial Unit Layouts
Adding Traits
Once a trial is created with materials and genotypes added in a layout, users can define the traits needed to be measured.
Note
Traits should only be added and defined by administrator level users. Please check with your administrator on what Traits can be added.
More details can be found at Traits and Add Traits to a Trial
Selecting Add a Trait to Trial (under Edit Trial dropdown) adjacent to the selected Trial will display the following Add Trial Trait window. The Trait is selected from a list of predefined Traits (refer to the Traits topic).
When the Compulsory field is set to ‘yes’ the capturing of the trait will become mandatory when recording Trial data.
Trials need traits added to them before they can be measured in the field. To add traits to a trial, select the Add Button (adjacent to the relevant trial) which will display the Add Trial Trait Window which can be seen in the image below:
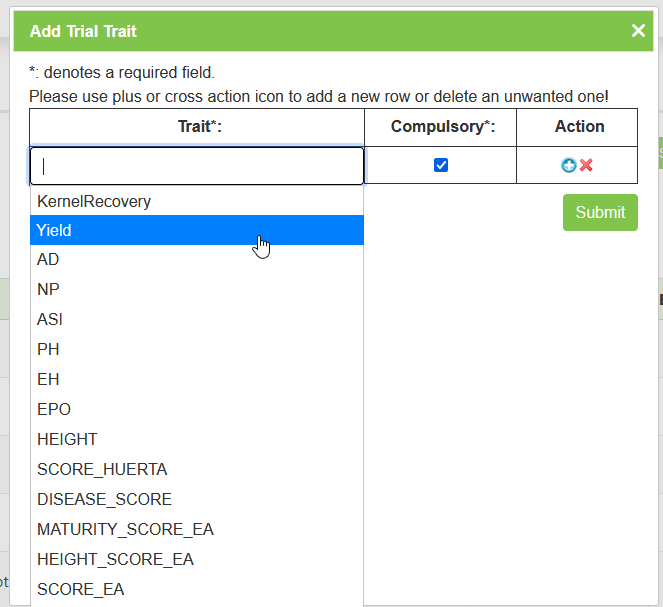
The trait is selected from a list of predefined traits (refer to the Traits topic).
When the Compulsory Checkbox is set to yes, the capturing of the trait will become mandatory when recording trial data.
More traits can be added by selecting “Add Trait to trial” (under the Edit Trial dropdown) from the Action Column.
Importing to KDSmart
With Trial layouts, Genotypes/Materials and Traits set up on the database, all of this setup can be than transferred to KDSmart and scored.
Once this data is scored, we can then export this in CSV format, transfer to a computer and then uploaded through KDManage to the database.
More details on downloading the KDSmart can be found at Exporting a CSV Template
A CSV template can be used to enter data into so that it can be imported into KDSmart and KDManage. The Export Template Button will open a window that provides options for exporting either a KDManage CSV template or a KDSmart CSV template (both options seen in the images below). The KDSmart format can be loaded into the KDSmart application for scoring trials in the field.
The download requires entry of the unit position for the row and column, and for each trait, the number of repetitions to be entered (default is one). When a trait is not required, zero should be entered to suppress the trait from the download file.
Users will be given the option to offset the specimen number. This should normally set to 0 unless legacy trials have specimen number 0.
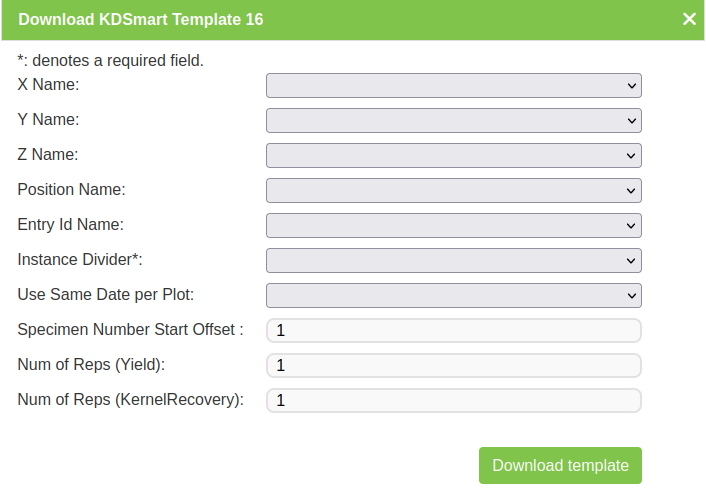
After this file is generated, this file can then be imported into KDSmart.
More details can be found at https://www.kddart.org/help/kdsmart/html/data-import-export-backup.html#csv-import
Comma Separated Value (CSV) files are a common file format that many users collect data with prior to using KDDart. Some users also use CSV files if they use KDSmart as a standalone application. More information about formatting CSV files can be found on the CSV Formats page at http://www.kddart.org/help/kdsmart/html/kdsmart-app-b.html
After selecting a file to import, each column in the CSV must be assigned an attribute type. This determines how the data in the column will be interpreted. Columns can be selected as Don’t Import as well as whether the data is related to the trial, a plot, or a trait name to be scored.
TO successfully import a CSV trial, the file must contain at least a Plot ID OR both Plot Column and Plot Row OR all three columns.
| Step | Action |
|---|---|
| 1. | Open the Trial Screen, Trait Screen, or Tag Screen on KDSmart and select the  Import Button or the Import As option in the Import Button or the Import As option in the  Menu Options. Menu Options. |
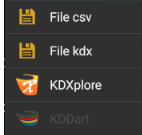
| 2. | The Import Options will open. If you are importing traits or tags, there will be the following options: Importing from the Trials Screen will result in an additional option to import KDX files: |
| 3. | Choose the File CSV Button. This will open the SAF as pictured below: |
| 4. | Select the CSV file you want to import and then select the Open Button. |
| 5. | Ensure that all headings are present and the Import As options are correct such as plot attributes and traits for plots. |
| 6. | Select the Import Button to finalise the trial import. |
Note
All types of CSV files (trials, traits, and tags) can be imported into KDSmart.
After this is done, please follow instructions at for full functionality of KDSmart https://www.kddart.org/help/kdtutorials/html/KDSTutorial.html
When scoring is complete, we can now export the data in a format that can be imported into the database through KDManage.
More details can be found at https://www.kddart.org/help/kdsmart/html/data-import-export-backup.html#exporting-sharing-data
The video and instructions below outline how to export data:
Note
The video provides an example of exporting trials but the same process can also be used for traits and tags.
| Step | Action |
|---|---|
| 1. | Depending on what sort of data you would like to export, navigate to the Trial Screen, Trait Screen, or Tag Screen. Choose a trial to export. |
| 2. | Select the Export To Button. You will be presented with the Export To Options. |
| 3. | Select the Tablet Button to export a data file directly to the device that you are using. The Choose Export Option Window will appear with the options that are listed above these instructions. |
| 4. | Choose an export option. The Storage Access Framework (SAF) File Chooser will open. |
| 5. | Select a file location on your device to save the exported file to. |
| 6. | Select the Select Button to finalise the export. There will be a notification on your device when the exported file has saved to that location. |
Uploading Trial Data
When the export data file from KDSmart is ready for import on a computer, users can use KDManage to import it into the database.
More details can be found at Trial Data CSV Format and Importing CSV Data - KDSmart Format
hen selecting the Upload with KDSmart Format option from the Choose Trial Data Format Window, the Import Trial Data Window will look like the image below.
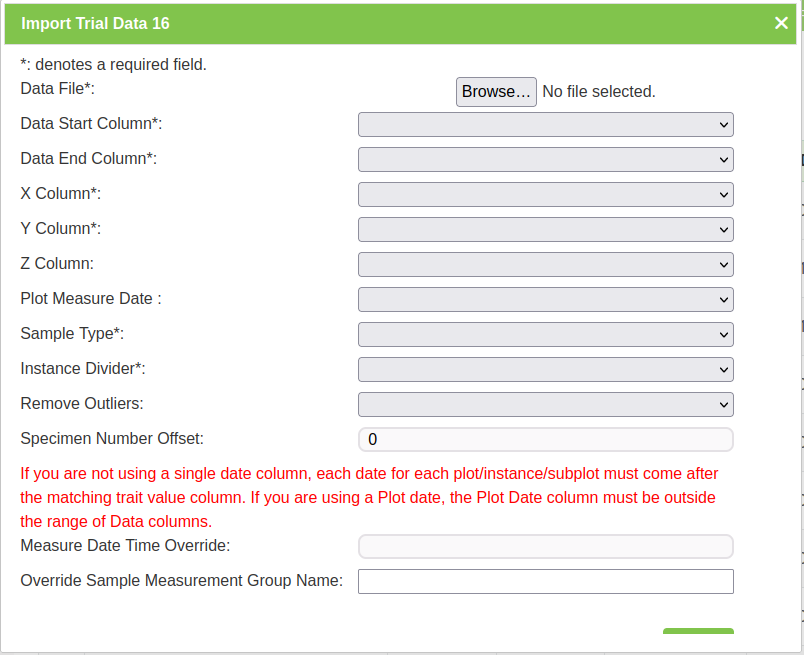
Note
It’s highly recommended that all data should be uploaded with barcodes.
Accessing Trial Data
Once data is uploaded, data can be access and viewed on trial page.
More details can be found at Trial View Page and Downloading Trial Data
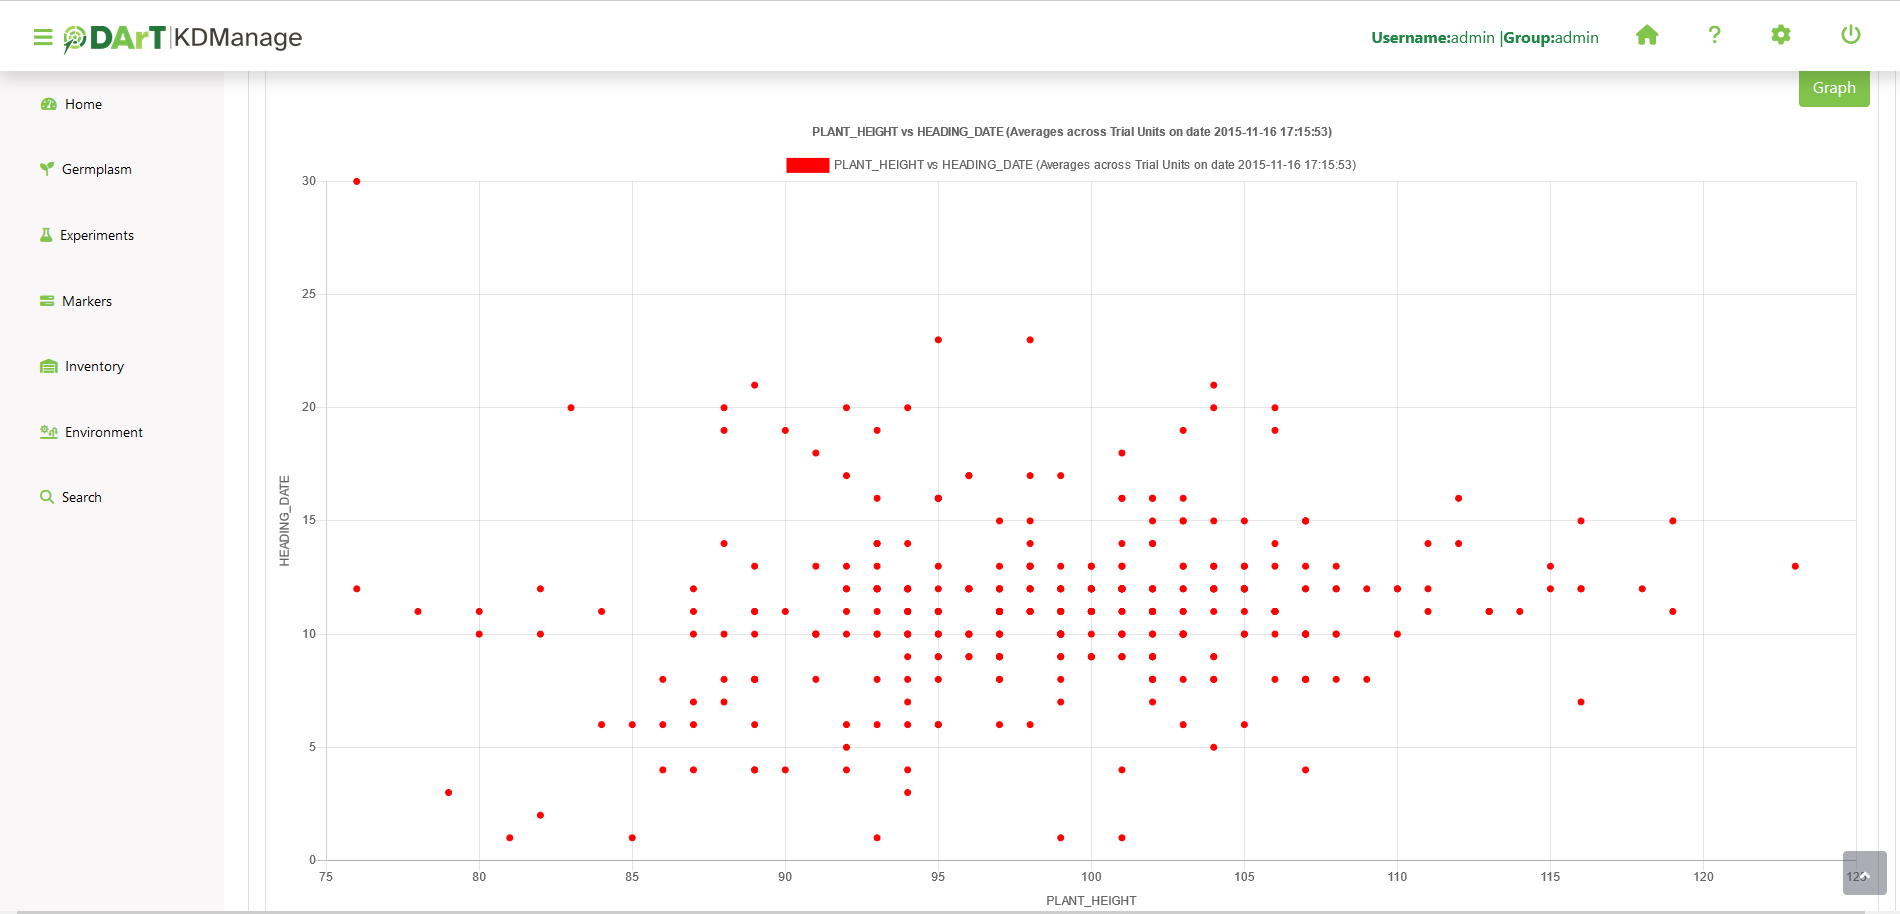
Trial data can be viewed in a graph which shows selected traits and value:
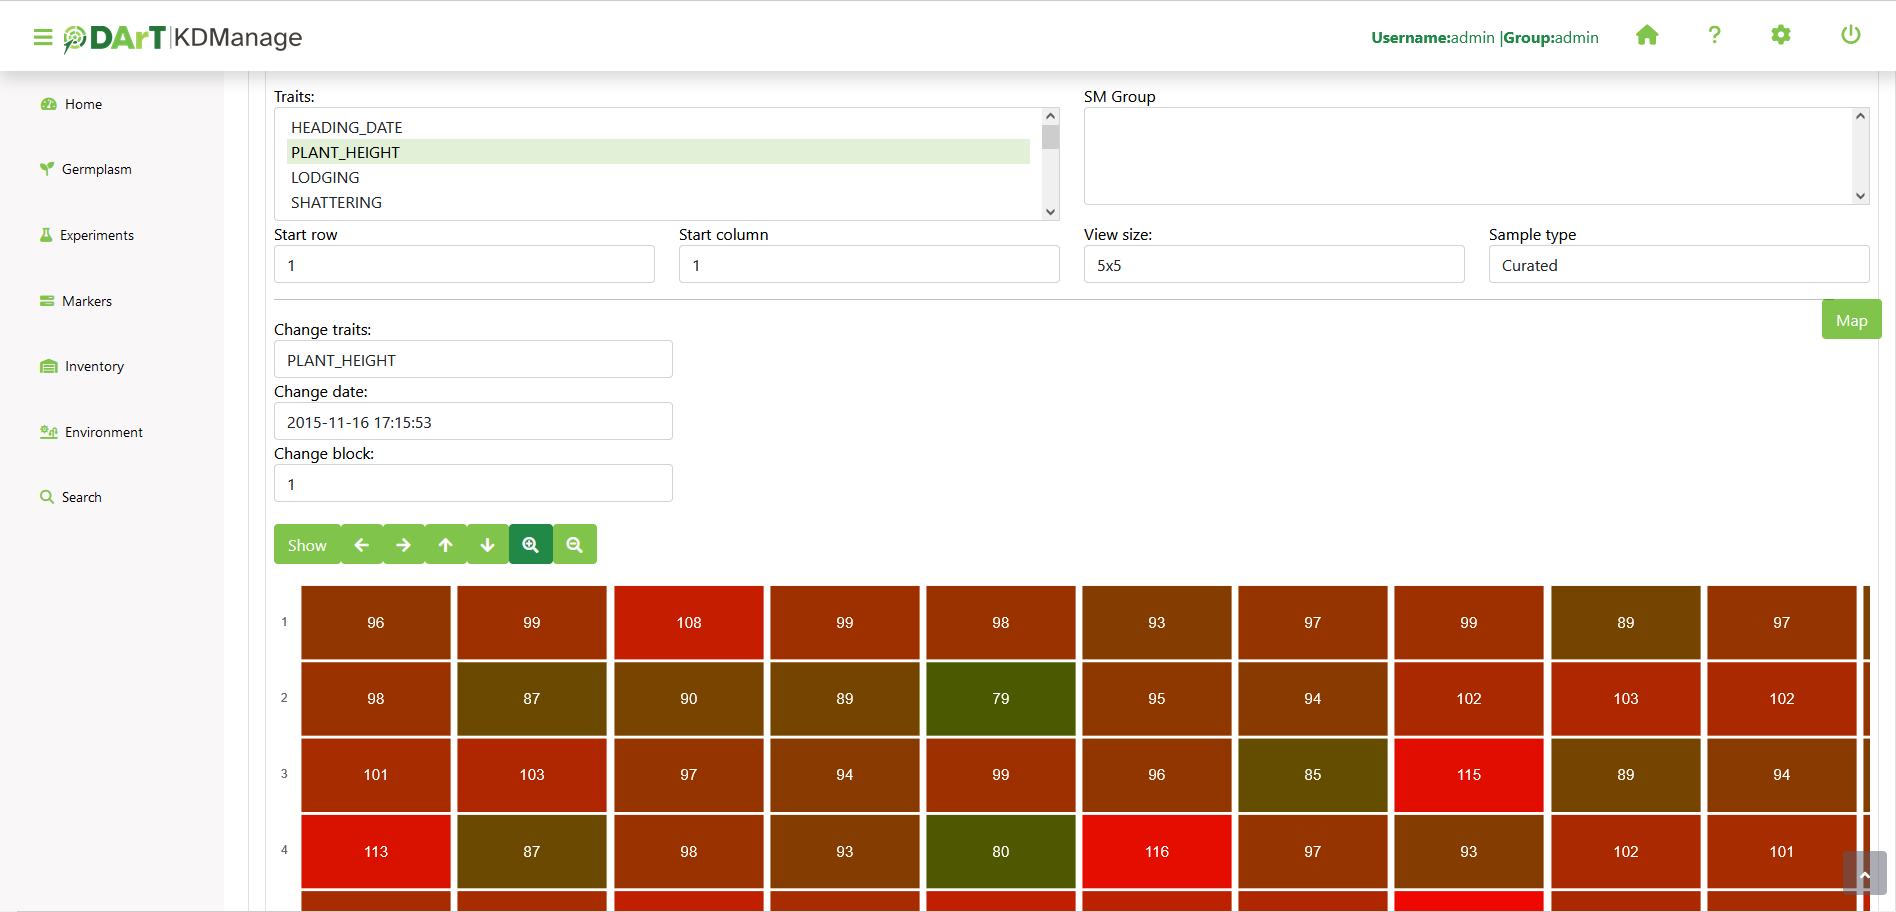
A trial data map is a heat map based on trial unit dimensions. Red specifies higher values while blue specifies lower values:
Curate Data Tab
The Curate Data Tab provides options for curating data that has been collected.
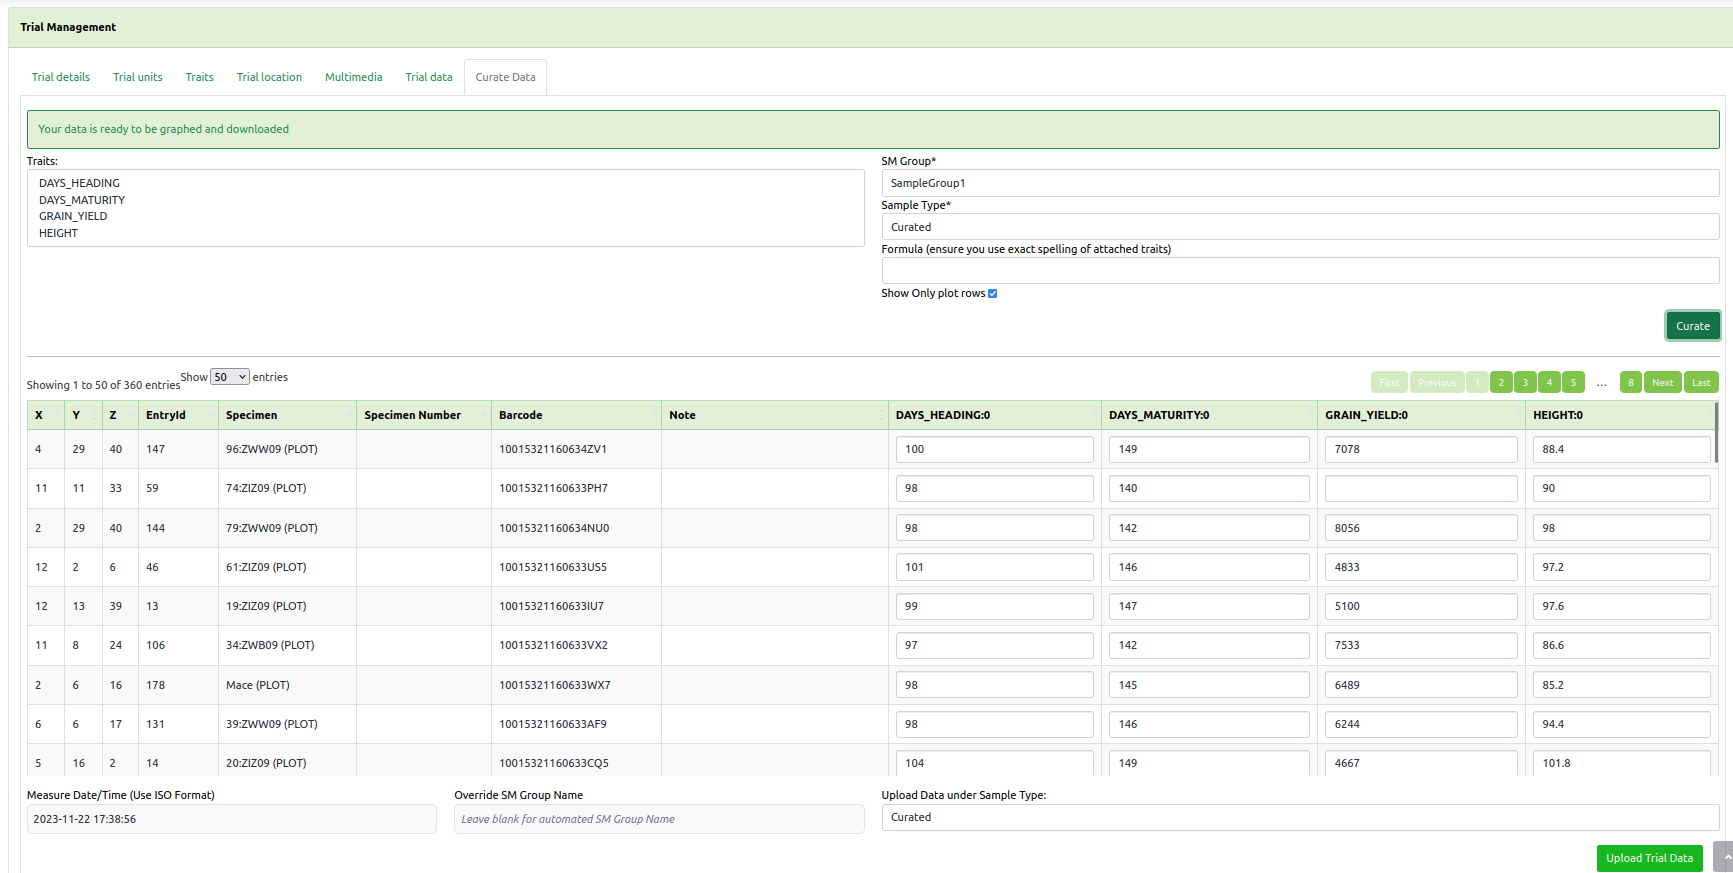
Existing trial data can be curated and imported as a separate instance in the Curate Data Tab.
Tip
Curated data will not always be imported as the same instance. Instances are determined on a per trait basis.
Using Trial Super Import
Trial Super Import allows to the above steps to be streamlined and done in a single CSV upload, including any collected data from KDSmart if included.
Prerequisite: Before the Trial Super Import can be used, a .csv file containing the relevant data must be prepared. This .csv should contain the columns listed within the Trial Super Import form.
This function allows the user to upload trial units for multiple trials with a single .csv file.
Where a trial already exists, it will update the existing trial. Otherwise, a new trial will be created with the given information within the csv. Similarly, existing trial units will be updated or created as necessary.
There are also flags that can be set in this super import function that will prevent certain actions:
- Allow creation of Specimens/Genotypes - determines whether specimens and genotypes that don’t exist should be created.
- Update existing Trial Information - determines whether an existing trial should be updated with given information.
- Update existing Trial Units/Plots - determines whether existing trial units/plots should be updated with given information.
Generally, it is useful to prevent these actions where it is certain that the data is uploaded exclusively for updating existing trials/ trial units. This way, spelling and other administrative errors will be caught instead of automatically added as a new trial/trial unit/ specimen/ genotype.
Phenotypic data can also be included and the columns containing measurements should follow the same format as seen in KDManage and KDSmart format data import CSV files.
To use the Trial Super Import, select the Trial Super Import button to display the Trial Super Import window.
More details can be found at Trial Super Import.

